A Beginners Guide: How Do MIDI Controllers Work?
MIDI (Musical Instrument Digital Interface) and How it Works
You’ve been making some killer sounds, you’ve got yourself some MIDI equipment, so now you want to play your sounds and Mixxed samples on your gear. But what makes this possible?
MIDI, in short, is binary (1s & 0s) data that represents musical parameters.
These parameters include pitch, tempo and other dynamics. Tools at your disposal generally vary from controller to controller.
MIDI converts musical notes into digital data that can be read and processed by your computer and other hardware.
Key Pressed – Data is Sent to Your Computer – Monitors Output as a Sound
Instead of using a mouse and keyboard to find, click and enter commands as well as piano roll notes, a MIDI controller enables you to operate in your DAW with buttons, faders, and knobs.
A quick note about controller knobs…
Knobs that have a 360-degree rotation are known as encoders. These knobs have an “endless” range.
Knobs that have a rotation of only 270 degrees are known as pots (potentiometers). These knobs have a capped range (which was kind of self-explanatory, I guess).
Why MIDI Controllers
MIDI controllers are so popular because of file sizes. MIDI file sizes are much smaller than digital audio files, so computers can process them much faster. This was realised when MIDI controllers were first taking the community by storm.
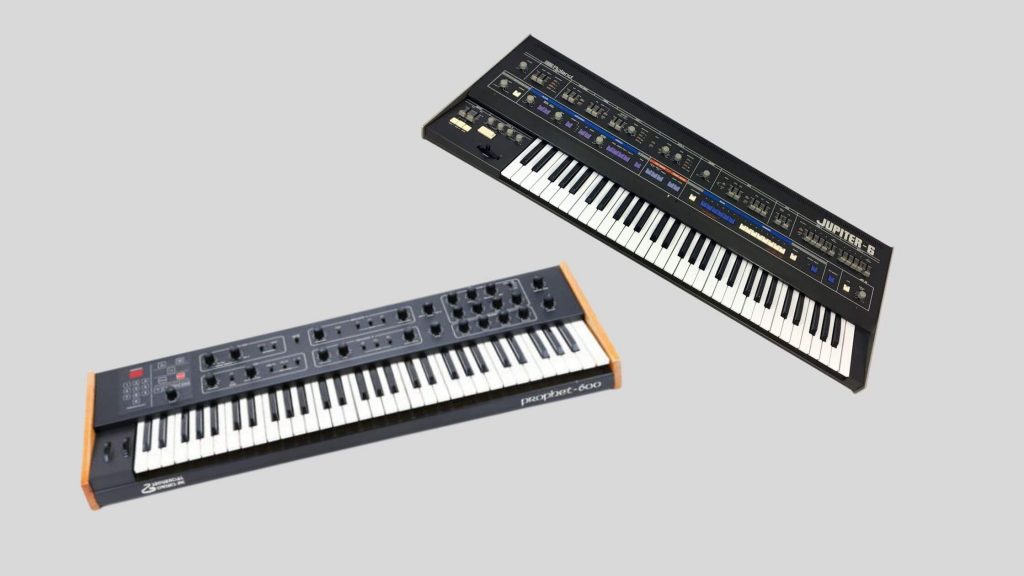
Two of the first MIDI controllers to begin changing the way music was made was Sequential Circuits’s Prophet 600 in 1982 & Roland’s Jupiter 6 in 1983!

Before MIDI, musicians played multiple instruments and then had to go through endless recordings until they got it just right. This sounds like it could take days, right? It did! MIDI was created to allow musicians to control more than one electronic instrument with a singular keyboard. This allowed them to manipulate and control sounds from various instruments in one place. An innovative tool that saved a lot of time, for sure!
Due to these revelations, people could create music at home – rather than pay an arm and a leg to hire a recording studio. Music was still expensive to get into, but much more accessible.
What Does MIDI CC Mean?
If you’ve been using MIDI or have been looking into buying a controller, you’ve probably been seeing “CC” a lot.
CC stands for Continuous Controller.
Controllers use numbered MIDI CC messages. So, CC#0, CC#1, CC#2… all the way up to CC#127. These numbers represent a specified DAW parameter/function that it controls. This is our means of switching between different controls and functionalities! CC’s are used for many parameters including things controlling volume (CC#7), panning (CC#10), velocity (more on this in a moment) and many more.
When using any feature of a controller, such as moving a fader up or down, the hardware sends a MIDI message to the DAW and tells it what to do – using MIDI CC# messages. So by bringing the fader up, your controller is telling your computer to bring the fader of parameter X (it’s default parameter or whatever you’ve assigned it to) up at the same time.
What is Aftertouch?
When you press a key, you’re applying pressure. Data from the controller is sent after the key has been struck and while it is sustained. This data is called Aftertouch.
There are two types of aftertouch.
The most common is channel aftertouch, which is dedicated to the average amount of pressure applied to all keys at any time.
Polyphonic aftertouch, however, is specific to individual notes. This is data dedicated to the timbre of a specific note over its duration.
Aftertouch data is important because it allows the computer to receive specific details about what and how you’re pressing, as well as what parameters you’re manipulating.
What is Velocity Sensitivity?
Velocity sensitivity is a mechanism that enables keys to respond to the speed/force of which they have been pressed by you.
Pressing a key gently will create a soft sound, whereas pressing it harder will create a stronger sound. Velocity is great to manipulate and use as a tool to make your compositions much more interesting!
To bring this technology to MIDI controllers, we have touch sensitive keys.
To replicate the vibrations that are caused by hammers inside acoustic pianos that strikes the strings, MIDI controllers house 2 sensors per key.
One sensor tells the computer which key you have struck, and the second sensor tells the computer how fast you struck the key.
Going back to our CC messages, the MIDI 128 velocity values. Again, these are 0 to 127. So, whenever you press a key the velocity you’re hearing is a value between 0 – 127. This is also where multi-sampling comes in. Like in the linked article, a sample pack creator would record the different velocities of the keyboard they’re sampling. These recordings are then represented as CC values.
What Are Velocity Curves?

Most, but not all, keyboards come with velocity curves.
Velocity curves are a selection of velocity parameter options available to you. They translate incoming velocity values from your keys and turn them into other velocity layers.
So, if you had a soft velocity option chosen you could play loud notes relatively quietly. If you ha a hard velocity chosen, you would have to strike the keys harder to get a loud output.
Velocity curves can be great to manage the loudness of your output. If you’re not looking to have loud notes, a hard velocity curve could make sure you don’t get any – as long as you play the keys softer.
