Define Synthesis: How Does Subtractive Synthesis Work?
Subtractive Synthesis Explained
My dudes and dudettes, we’ve come a long way from where we were. In the previous article of our Define Synthesis series, we answered the question How Do Synthesizers Work?
We discovered what oscillators, LFOs, filters & ADSR envelopes do. If you aren’t familiar with the components of a synthesizer, we strongly advise you to read the previous article that we have linked above.
With all of that out of the way, we can take a hike up the small hill of subtractive synthesis before we take on the mountain peaks of other synthesis methods!
Define Synthesis Series
How Do Synthesizers Work?
How Does Subtractive Synthesis Work?
How Does Additive Synthesis Work?
How Does FM Synthesis Work?
How Does Wavetable Synthesis Work?
How Does Vector Synthesis Work?
How Does AM Synthesis Work?
How Does Modular Synthesis Work?
How Does Granular Synthesis?
How Does Sample Based Synthesis Work?
How Does Spectral Synthesis Work?
How Do Vocoders Work?
Subtractive Synthesis Basics
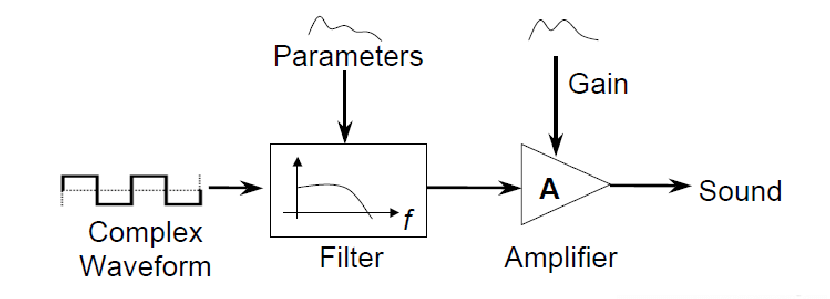
Subtractive synthesis is a synthesis technique that removes harmonic overtones/sidebands from the sound source/oscillator with the use of filters. Harmonic overtones, in a nutshell, are additional harmonics frequencies that are stacked on top of the dominant frequency of the note you’re playing. We’ve explained this in detail in How Do Synthesizers Work?
With this in mind, we need an oscillator that’s rich in harmonics like a saw wave or a square wave. We wouldn’t use a sine wave because these are pure tones of a frequency – which means no additional harmonics.
This allows you, my humble sound designer, to sculpt a sonic texture/timbre of your choice from the sound source. You can do this with a hardware synth, like the Moog One, or a virtual instrument (softsynth) like Serum (which is a wavetable softsynth, more on that in a future article).

How Does Subtractive Synthesis Work?
Fighters, choose your weapons.
Your weapon, at least in this instance, is your sound source. Let’s go with a sawtooth oscillator merged with a square wave oscillator. We have a raw sound that’s rich in harmonic overtones. That gives us lots to chisel away.
Sounding pretty sweet, right? You have a strong, harmonic, sound. Let’s proceed with this subtractive synthesis tutorial!
Let’s give the sound more of a shape. Right now, you have a sound that has sustained amplification right the way through. Jump into your ADSR envelope and apply a quick attack, short hold, a short sustain and decay, as well as a release that’s not too long. Now you have a plucky sounding synth sound. Mess around with these settings however you like.
Now move all the way to the filter. Your upper harmonics are sounding a little bit buzzy, so let’s use the filter to do something about that. Apply a low pass filter at 18dB – this will lower the volume of those upper frequencies in multiples of 18dB for each octave above the pass band. Set the frequency to around 2000Hz/3000Hz – or whatever you fancy.
To emphasize the pluck of your sound, use the filter cut off and set it to start cutting off your desired frequencies at the start of the sound. To truly define that pluck, apply an LFO to the filter cut off and modulate the frequencies that you like the most.

Subtractive Synthesis Sound Applications
Now that you’ve got some hands-on experience with subtractive synthesis controls, you’re now at peace with how subtractive synthesis works.
If you’re looking to create some warm, lush, keys, subtractive synthesis is your friend.
You can apply this knowledge to any sound or sample, that you can download from the Mixxed site, as long as they have harmonic overtones!
See you next time for our explanation of additive synthesis!
