Define Synthesis: How Do Synthesizers Work?
How Do I Make Sounds for Music Production?
Greetings to you, homie. You’re here because you want to learn about synthesis, huh?
Welcome to synthesis boot camp. Our mission is to dive deep into the realm of sound, how it works, and just how we can use synthesizers to manipulate those invisible vibrations that we call soundwaves.
You’ve downloaded some awesome percussion samples and loops from Mixxed, but now you want to learn how to master the world of synthesizers.
In this article, we’re starting on the ground floor of the Synth Hotel. Obviously, that’s not a real thing. But by the time we’re finished, you will feel like you’re the manager of a 5 star sound design experience.
To start this series off, we’re swimming in the pool of Oscillators, LFO’s, Filters, and Amplification (also known as ADSR Envelopes) so you fully understand the foundations of synthesis before we jump into mechanics.
Define Synthesis Series
How Do Synthesizers Work?
How Does Subtractive Synthesis Work?
How Does Additive Synthesis Work?
How Does FM Synthesis Work?
How Does Wavetable Synthesis Work?
How Does Vector Synthesis Work?
How Does AM Synthesis Work?
How Does Modular Synthesis Work?
How Does Granular Synthesis?
How Does Sample Based Synthesis Work?
How Does Spectral Synthesis Work?
How Do Vocoders Work?
What Are Soundwaves?
Science caps on!
Soundwaves are vibrating waves full of pressure that travel through the air. They travel into our ears and cause our eardrums to vibrate in response to these changes in pressure. These atmospheric changes are sounds.
Now, for the fun bits…
What is an Oscillator?
Oscillators output a repeating signal in a waveform. What you hear as the user is the full sound of a waveform that contains all of the waveforms’ natural characteristics. This includes its dynamic range and harmonic tones.
Each waveform is unique by the way each one oscillates between its minimum and maximum amplitude (for example 0 to 50, 0 to -50). The shape that these oscillations take as a waveform determines the timbre or tone of the sound.
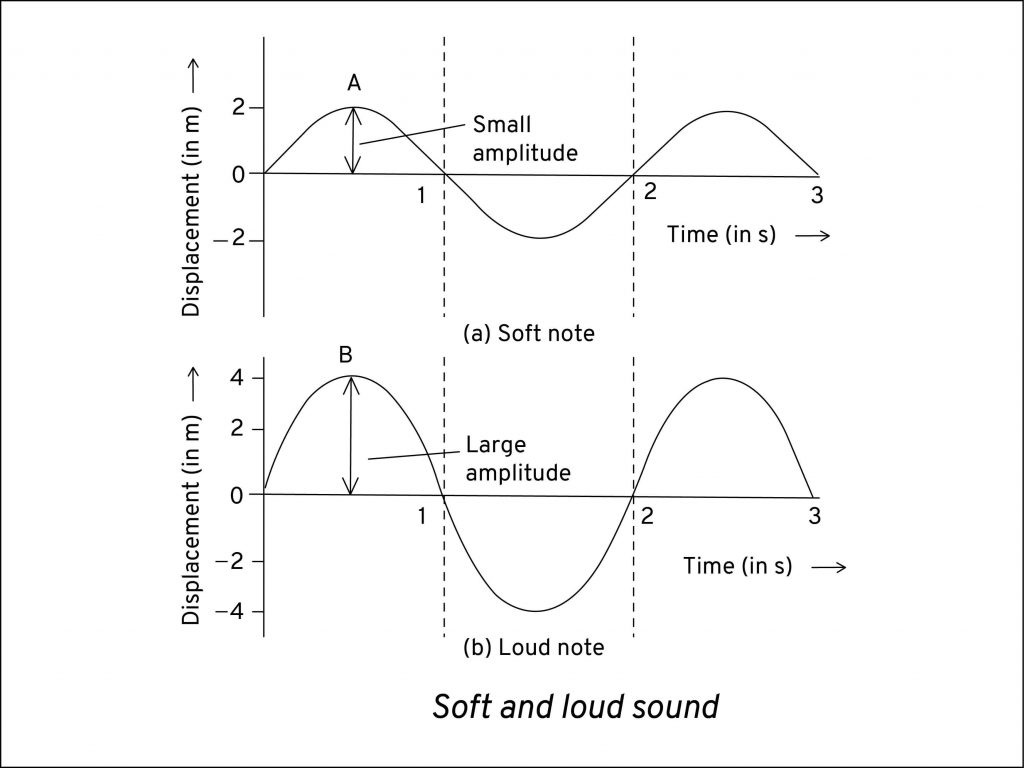
One oscillation = one cycle.
Sounds that we hear are vibrations in the air. With that in mind, oscillators generate digital “vibrations” that are converted into sound once connected to an output, like speakers. If you can picture the way guitar strings move back and forth, oscillators cycle between positive and negative values (amplitudes) in this way.
We puny humans only hear these cycles when they occur between 20 and 20,000 times per second (20Hz – 20kHz = range of human hearing). The lower the rate, the lower the pitch.
So, the frequency and/or pitch of tone are determined by the rate of these oscillations. So, if you throw the hammer down on the E note in one octave and do the same in a higher octave straight after, the fluctuations will speed up once you move to the higher octave.
What Are The Four Common Oscillators?
Sine Wave
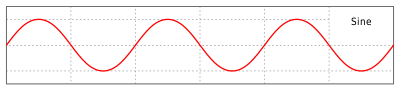
If you’ve never heard of the fundamental, it’s the pure tone of a single frequency – and that is what a sine wave is.
Sine wave edges are very smooth with no jagged corners. This means sine wave generates a mellow sound that’s very smooth, which can make them great for recreating tube sounds like flutes, for creating pads, and basses.
To find out how you can turn a sine wave into a ripping neuro bass, read our Sine Compression Bass Tutorial article.
If you’re curious as to what is the frequency of a sine wave is, the answer is the total number of cycles the signal oscillates. More cycles = higher frequency.
Sawtooth Wave
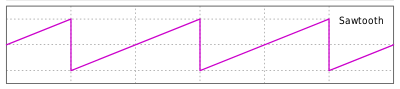
The next common waveform is the Sawtooth wave.
The kings of harmonics. If you’re looking to create a powerful lead, see what a sawtooth can do for you.
A sawtooth wave is named because it looks like teeth on a chainsaw (shocker, I know). Sawtooth waves have sharp points which generate a very strong buzz sound. The strongest buzz of all the common oscillators, in fact.
Saw waves have harmonic frequencies at even intervals, but they get progressively quieter at each one.
Square Wave
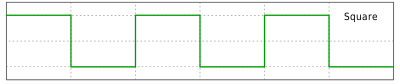
Rich in harmonics, square waves also have a buzzy sound. Not quite as buzzy as a Sawtooth, but not as smooth as a sine wave.
Not the most harmonic oscillator around, but unique because the harmonics repeat every second cycle. Each harmonic in a square wave is a third as low in amplitude.
A square wave played at 100Hz will have harmonics at the 300Hz, 500Hz, and 700Hz marks, whilst continuing at all odd multiples. Because each harmonic decreases in amplitude at different rates, the shape is affected differently each time.
Square waves fluctuate between positive and negative values suddenly, and this earns square waves the name “pulse waves“.
When we talk about pulse width, we’re talking about the distance between waveforms positive and negative positions. Adjusting pulse width will change the harmonic content of a waveform and create a swishy sound effect. This is pulse width modulation (PWM).
Square waves are unique pulse waves. Its signal pulses on and off with every cycle, seemingly suddenly. This makes square waves are great for creating ghost notes or wind instruments because they sound “hollow”.
Triangle Wave
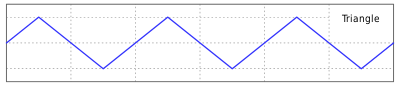
Triangle waves sit somewhere in between square waves and sine waves.
Like square waves, they also have harmonics at odd multiples of the original frequency. They differ, however, because the harmonic amplitudes drop off quicker than square waves.
Because of this, they sound much more like sine waves, while retaining the buzzing quality of a square wave.
What Are Harmonic Overtones?
No sound produced in nature, or on an instrument, will give you such a clean harmonic tone like a sine wave. All C notes, sung by a man, woman, or saxophone, would all sound the same. What gives each of these mediums its unique sound are the harmonic overtones produced by throat structures and brass housing.
All sound sources produce a combination of overlapping waveforms, and these are harmonic overtones.
Whether sung or played, the dominating frequency is the note that we perceive. All other frequency vibrations add unique character, what we call timbre, to the note. So, the timbre of the sound depends on the source.
If there was no dominating frequency, the sound would just be noise.
Oh, and a quick note on noise.
White noise has equal power across the entire frequency spectrum. The shade/colour white is more intense than pink.
Pink noise has more power in lower frequencies than it does in higher frequencies. The colour pink is more intense than Red.
Brown/Red noise is even less powerful in the higher frequencies than pink noise. The colour red is less intense than pink and brown.
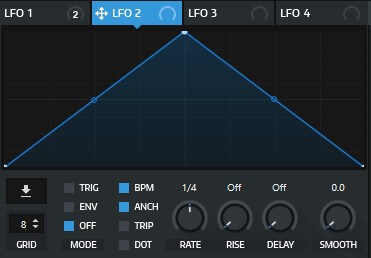
What Are LFOs?
So, that was oscillators. One of the types of oscillators. Time to find out about low frequency oscillators
Low frequency oscillators (LFOs) are oscillators with a slower rate than the oscillators we discussed above. We apply LFOs to other components of our sound, such as vibrato (pitch modulation), to create movement.
Their one and only job are to be forever transitioning between their minimum and maximum values. The rate is set by the frequency parameter, or “rate“, which the user has control over.
Whereas typical oscillators can’t go slower than 20 cycles per second (for us to hear them), LFOs have the ability to go slower and last more than five minutes between cycles. This is why they’re used for recurring modulation that we can’t do with standard oscillators.
LFO’s come with settings like “delay” where the user can input how many bars the LFO should wait until coming into action.
What Are Band Filters?
Now it’s time to look at a tool for cleaning up signals, as well as add more creative flair to a sound.
To sum them up, filters allow you to cut out or emphasise frequencies of your choice. They’re also great for adding movement to your sound like LFO’s, but do it in a different way.
We use them to clean up signals. So, if you recorded yourself playing the guitar but a car rumbled past outside… a high pass band filter will probably be enough to get rid of it.
A filter is defined by its shape (its slope) because this determines what signals will be removed or emphasised when the filter is applied. Any frequencies in the “pass” band will be kept, but any frequencies not will be removed.
So, by applying a high pass filter to your guitar recording, you’re able to remove the low frequency car rumble!
The standard slopes you’ll see on most, if not all, filters are 6dB, 12dB, 18dB, and 24dB. If you were to apply an 18dB high pass filter to your recording at 2000Hz, any audio an octave below that will decrease in volume by 18dB, and any audio an octave below that octave will be lowered to 36dB, etc.
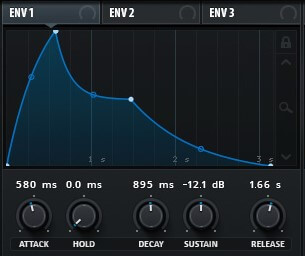
What Are Amplitude Envelopes?
We’re almost there. We’re at the final stop before the highway to synthesis.
Attack, Decay, Sustain and Release, or “Envelopes“, are an important part of the sound design process. To put it simply, they allow you to shape the amplitude of the sound.
Attack is the beginning of the envelope. It represents the time taken for the amplitude to reach its highest level, so you could say it’s a build-up of the sound.
Hold, in a nutshell, allows you to keep the highest point of the amplitude where it is until you want the decay phase to come in.
Decay is the reduction of the amplitude of the sound. Once in decay, the signal level drops – until it makes it to the sustain level.
Sustain is the phase where the sound holds a constant amplitude before it begins to fade out at the release phase.
Release is the final phase where the amplitude reduces over time until the signal finishes.
That’s a Wrap
Boom! If you’re holding a microphone, drop it.
So, that’s the fundamentals of a synth VST covered. Now we understand what these features do, we can see how they’re applied to different methods of sound design.
See you next time, where we’re talking about subtractive synthesis.
READ MORE: Reese Bass Tutorial