
How To Create a Vocal Chain
Laying down the verse is one thing, but making it sit right in your mixdown is another. That’s where vocal chains come in.
Every song you hear with vocals has a vocal chain. From pop to rock, hip hop to folk, and the rest. A vocal chain boosts the vocal signal so it can stand up against all of your other elements and much more.
What is a Vocal Chain?
A vocal chain is what makes your weaker vocal signal into a stronger one. A vocal chain removes unwanted frequencies, fills out the remaining ones, and gives the vocals a space of their own.
The most important thing to take note of in a vocal chain is your signal flow. Like in all other techniques in music production, the order of your plugins in your vocal chain is very important. Rather than explain why we’ll take you through a basic vocal chain so you can see for yourself.
Subtractive EQ
At the beginning of our vocal chain, it’s good to cut away the frequencies that we don’t want. We want to do this before amplifying the signal because we’re not boosting frequencies that we don’t actually want.
Take a listen to your vocals in context with the rest of your song and determine what frequencies are clashing with your other instruments and sounds.
We cut unwanted frequencies away before amplifying the signal because we’re not boosting frequencies that we don’t actually want.
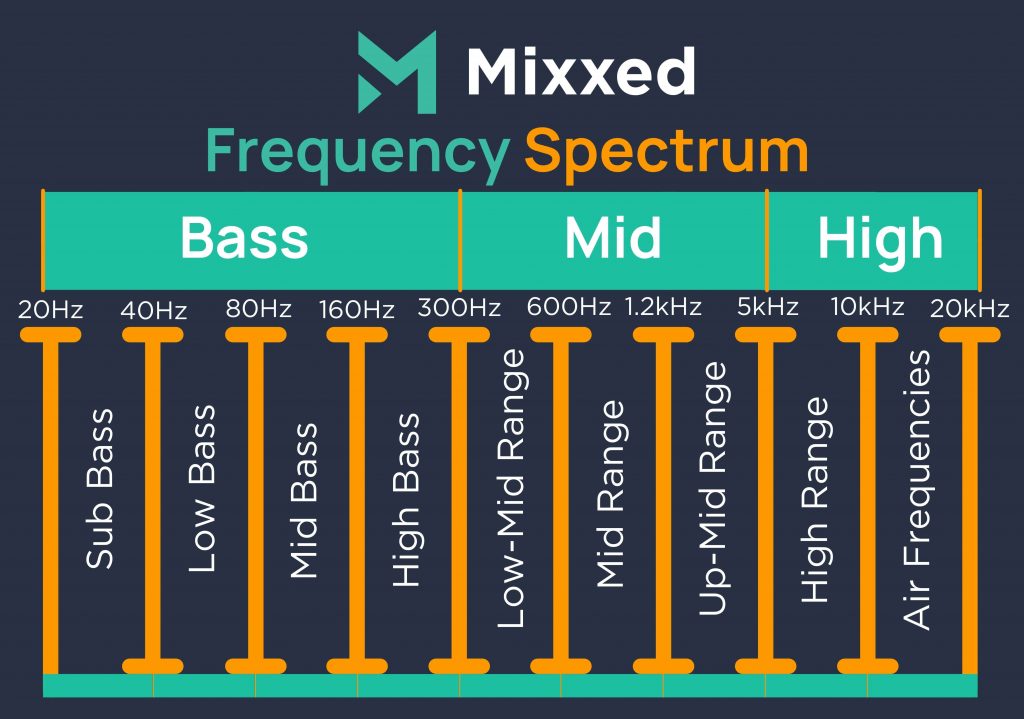
Making use of a high-pass filter is a great start. Remove anything below 160Hz at least, and make some subtle cuts to 700Hz and 5kHz. You’ll find your vocals are sitting better already!
Each vocal recording is different so use your ears to determine what you’d like to cut.
Insert a Preamp if Needed
Unless your vocals were recorded using a pre-amp, it’s a good idea to insert one after your subtractive EQ. A preamp applies positive or negative gain to an input signal in order to achieve the level of amplitude you need.
As we said, if your vocals have already been recorded through a preamp, there’s no need to apply any more gain to your signal. However, if you’re using your interface’s onboard preamp (plugging a mic directly into your interface), then applying gain using a plugin emulation like Arturia’s 1973-Pre is a good idea.
We recommend not going any higher than -12dB. This leaves plenty of headroom for further processing and avoiding clipping.
Add Some Compression
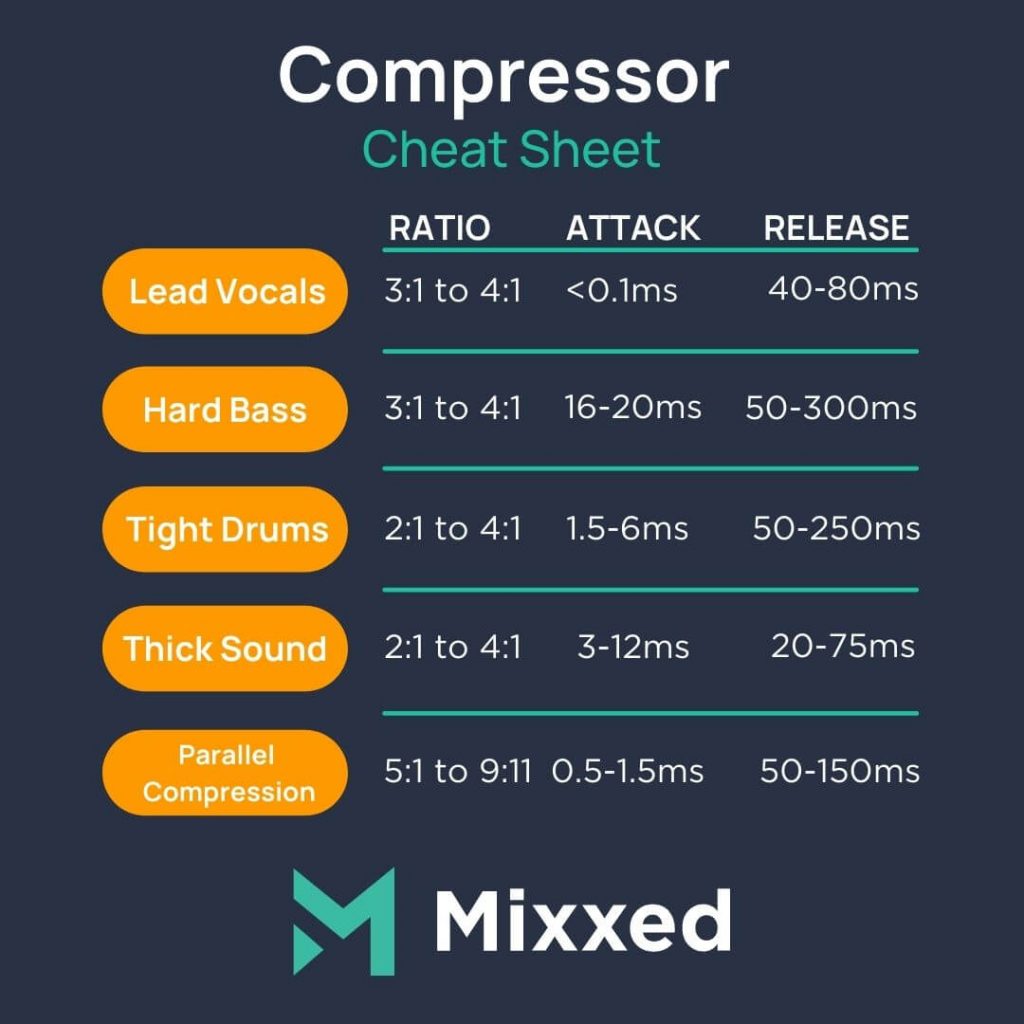
Next, we’ll apply some compression. Applying a subtle squeeze to the vocal signal allows us to even out the peaks in our signal. This leads to a sound that is fuller, and thus more powerful.
How you decide to compress the vocal depends on multiple factors. However, it’s a great idea to use a super quick attack time so the compressor begins compressing straight away. In addition, a slower release time gives us a lot of control over our signal, and you won’t hear the vocal suddenly dip in volume between phrases.
On top of a compressor, applying a de-esser allows us to remove sibilance like harsh s’s and t’s. Sibilance sits somewhere between 5 – 10 kHz. You’ll notice how your signal is much smoother.
Saturation
Saturation allows us further fill the sound out. This is because it’s the harmonics of the signal we’re about to emphasize with a saturator. In turn, this makes the fundamental frequencies easier to perceive. A tube saturator that is emphasising second-order (even) harmonics allows us to add warmth to our signal.
This gives you a truly rich signal.
Use Bus Tracks for Reverb & Delay
Finally, it’s time to give the vocals some space.
Applying Reverb
By adding reverb, we can simulate a room, and this helps our artificially dry vocal feel more alive.
To make your vocal sound like it’s in a room, set up a bus track or 2. Send your vocal signal to both a room reverb as well as an ambient reverb. These reverbs are usually short and lead the vocal to sound fuller, as well as realistic.
A low decay time on our room reverb means the room we’re simulating feels smaller. Coupled with a low pre-delay, and full stereo width that we can automate to attenuate and increase in different sections of our song, we’re on the way to giving our vocal that natural vibe.
Now it’s time for our ambient reverb settings. Set up your medium or large reverb using a second aux track. The ambient reverb is to be a more stylistic reverb compared to your room reverb (as the room reverb is only emulating natural reflections in a space).
An ambient reverb makes our vocal signal sound, quite frankly, more impressive. Different genres apply it in different ways. Ambient reverb doesn’t really need to be too realistic as we’ve taken care of that with our room reverb. Get creative!
Play around with settings on both your ambient and room reverbs and then begin blending them both in with your original vocal signal via your aux track faders.
Applying Delay
A little bit of delay can be fantastic for that final polish to vocals. Some delays can be short to thicken the vocal, while some will be longer for creative effect. Keep in mind that all delay taps should be in time with the rest of your track. Most delays have a sync button ready and waiting for you to click.
If you find that you like a large amount of feedback, it can be a good idea to apply a subtle bit crush via the same delay aux track. Crush the signal to a resolution of 8 bits or so. You might find this effect a bit aggressive, but give it a shot. You may find that the extra distortion introduced by the bit crusher can help the delay effect cut through a mix.
Finally, we’ll run the feedback signal through a high pass filter and cut it off at around 1 kHz. This helps us remove low-frequency rumble and noise and ensure that the echo doesn’t run into the dry vocal signal. This is important for the 200 Hz – 500 Hz range as this is where our voice’s fullness resides.
Are you ready to put your newfound knowledge into practice with some ep[ic vocal samples?
The sampling revolution has risen in popularity and shaped music since the early 1970s. Sample culture continues to transform how millions of artists and producers do their thing in DAWs.
You too can break conventional norms, challenge the status quo, and open Pandora’s box of sound design.
Mixxed works with a growing number of sample labels and contributors to provide you with an affordable sample subscription service that’s more accessible than any before.
You’ll have access to our growing catalogue of loops, one-shots and sound effects that you can browse, download and keep forever for less than $3 a month.
Sign up today to find your sound!