
How to improve your mixes – 10 useful tips for Music Producers
As a music producer, knowing how to improve your mixes and make your productions sound as professional as possible is just as important as having the right snare! In such a competitive field the way your track sounds can really help it stand out from the crowd.
Mixing a record well is however something that requires skill and attention to detail. The greatest audio mixers have years of experience under their belt and golden ears that have been trained to the highest level. But don’t let this put you off. With today’s technology, everyone has access to the sort of tools necessary to create platinum-sounding mixes straight from your laptop. In this guide, I will be serving up 10 useful tips to help improve the sound of your mixes.
Tip 1: Clear session – Clear mind
When those creative juices start flowing it’s very easy to end up with a rather chaotic DAW session. Random tracks, instruments, and plugins are often scattered all over the shop. Once you’re satisfied with the compositional side of a track it’s always a good idea to have a proper tidy-up.
Get rid of tracks and plugins that were not used. Arrange, name and group tracks accordingly. Stem out or consolidate tracks whenever possible. Many producers also find it useful to colour code tracks.
Having an organized clean workspace when approaching a mix can really help you visualize the track as a whole. It also makes it much easier to navigate and make adjustments.
Tip 2: Make sure all the groundwork has been done well.
It seems obvious but one of the main keys to improving your mixes is to have the best quality elements to start with. If you’re recording vocals or live instruments take extra care with mic placement. Make sure your recording levels are not too quiet or loud. And probably most importantly consider the acoustic properties of a space. Take steps to deaden the acoustics of the space you intend to record in. If you can record remotely the cockpit of a car often makes for a great deadened environment. For more on how to treat the acoustics of a room check out this blog https://create.routenote.com/blog/what-is-acoustic-treatment/

If you are working with virtual instruments or samples spend time sourcing the highest-quality examples. Then make sure all the melodic elements are in tune with each other. Also consider the frequency allocation of your track, wherever possible selecting instruments that each have their own frequency areas. Layering drums for example can help to control and supplement certain frequency areas.
Tip 3: Balance your levels before you start (Gain Staging)
Use gain staging to set appropriate levels for each track before you start a mix. This relates to the volume of the audio before any processing has been added as indicated in your VU meters.
If a track’s volume is too low you may get unwanted noise when boosting the signal. Alternatively, if a track’s volume is too high there may not be enough headroom to make adjustments such as EQ. This may result in the signal going into the red and clipping. As a general rule keep your tracks’ peaks around 9–10 dBFS and the body of your waveform at around -18 dBFS.
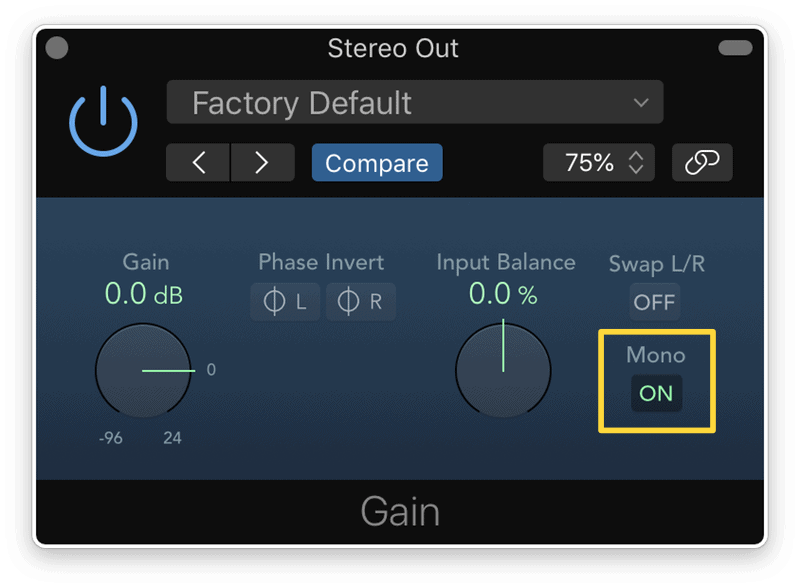
Tip 4: Mix in Mono
This tip is slightly controversial but many top mix engineers swear by this method. The theory is that with everything in mono, all of your elements are sitting right on top of each other. This creates a more realistic picture of a mix forcing you to make more informed and clear EQing decisions.
Once all your elements are sitting nicely in their own respective frequency areas you can then start to pan certain tracks. Your mix should then come alive as the stereo field is widened.
Tip 5: Reference similar tracks
This tip is all about keeping your mix in perspective through comparison. It’s a good idea to select 1-3 tracks that represent the sort of sound you are looking to achieve in order to use as comparisons. It’s important that these reference tracks are in a very similar vein to the track you are attempting to mix. Try to find ref tracks with similar instrumentation, or energy. There is no point using a sparse ref track if your production is full and busy.
When using a reference track it’s important to bring the volume down to match the track you’re mixing. The ref track will have been mastered so make sure the volume matches your mix once you have done all the gain staging and created a roughly balanced mix. Once you’re all set up and in the mix it’s good to take quick breaks to reset your ears before making any A/B comparisons. And when you do compare your reference track(s) play only short segments, 4 bars of each for example. Make notes of the direction you need to travel in and make the appropriate moves.
It’s also worth noting that there are a number of plugins that will analyze the EQ curve of your reference track and then apply it to your mix. Izotope’s Tonal Balance Control 2 and Fab Filters Pro Q 3 are two such tools.
Tip 6: Don’t just process for the sake of it
It’s very easy these days with ever more powerful computers to go mad and add compression, EQ and effects plugins on every channel! Instead, it’s better to hold back and try to pinpoint the areas that need work.
If you did a rough mix and balance of the track whilst at the composing stage then bounce down this ‘rough mix’ first. Then apply Tip 1 and tidy the session up.
Once everything is in order, gain stage all of the channels, turning off any processing or effects. Get a rough balance of all the elements and save the session as Mix v1 clean sweep. You can then proceed to make incremental mix decisions based on what needs to be addressed, saving as you go along (i.e Mix 2,3,4,5 etc)
This way, if you feel that you’re over-processing and losing the original vision for the mix, you can go back and A/B to make sure you’re still on track and moving in the right direction. As you will have a full mix history you can go back to where the mix was sounding best. Rather depressingly this can often be the initial rough mix!
Tip 7: Take a Break
This tip is often overlooked but one of your worst enemies when mixing a track is ear fatigue. Mixing is all about having a clear perspective on the overall sound of a track but if you’re spending hours labouring over small details that perspective can be lost. Taking regular breaks away from the screen and returning afresh can often offer that crucial perspective. The longer the break the better as your ears will re-aclimatise themselves. Sleeping on a mix and coming back the next day often reveals much more about a mix than 3 hours of tweaking and twiddling.
Tip 8: Keep it down!!!
Like the previous tip, this one also concerns, amongst other things, ear fatigue. When monitoring at high volume your ears become less sensitive to certain frequencies. You might therefore end up compensating for this by making incorrect adjustments to the mix.
Our perception of frequencies and dynamics is also affected when listening at high volume. You might find yourself boosting or cutting frequencies excessively to compensate for ‘perceived’ imbalances. When played loud everything sounds more forceful and exciting. This is because our ears naturally compress and limit loud music in order to protect our ears. You may therefore compress elements of the mix too aggressively, resulting in a loss of dynamic range and musicality when played back at normal levels.
I would recommend monitoring at a comfortable and constant volume. Some engineers such as the legendary Bob Powers have gone on record saying they like to monitor at very low levels. The theory is that if all the elements can be heard clearly with the desired energy/vibe at a very low level then it should translate to all volumes.
Tip 9: Playback on different systems
While it is important to use monitors that you know and trust for your main mixing duties but it is also important to reference mixes on other speakers too. Something may sound poppin’ on your studio monitors but a good mix should sound great on all speakers, including, I hate to say it, a laptop or mobile.
Headphones for example can be fantastic for revealing issues in a mix. Especially if these are your everyday headphones that you’re used to. Incidentally, when testing your mix on other systems I would recommend sticking it between two good reference tracks (see Tip 5) for that all-important perspective.
Another classic testing ground is the car stereo! Legendary Hip Hop producer DJ Premier will not sign off on a mix until it’s passed the MPV test! And if you’re making club music then trialling a new mix on a Club sound system can be the ultimate litmus test. If you know or maybe are a DJ then don’t neglect this one.

Tip 10: Ear Training techniques
This final Tip may require a certain amount of dedication but training your ear to accurately detect frequencies is the thing that can really take your mixing abilities to the next level. Knowledge is power and if you can train your ears to analyze and accurately identify certain frequencies within a mix, then you will be able to make effective EQing decisions with Jedi-like efficiency.
Frequency recognition works in the same way a trained musician will instantly hear and recognise a musical note. When applied to white noise frequencies have very specific sounds. For example, 500hz is represented by on ‘O’ sound while 4khz makes an ‘ee’ sound.
There are many online guides and courses available that specialize in ear training but ultimately like all learning you have to put in the work.
Summary
I hope these 10 tips are of some help to you. I choose not to get into very specific mixing techniques, instead focusing on general good practices. For advice on more specific mixing techniques and plugins, we luckily live in a world where you’re never more than a few clicks away from a solution. For more in-depth coverage of all things audio engineering, I would highly recommend checking out the Pensado’s Place YouTube Channel.
But the main thing is to just keep working on your audio mixing. The more experience you get the better you will eventually become. Good Luck!
Remember – RouteNote Create subscriptions start from as little as $2.99, and you also get 10 FREE credits to spend on samples when you sign-up as well as your FREE sample bundle!