
How to Mix Vocals to Make Awesome Music and Send Your Listeners to Outer Space!
Curious about how to produce vocals? Not singing them, we mean processing recorded vocals to get the most out of them! If you can’t mix vocals, your song will probably sound amateur. A vocal lead is usually the most important part of a song, so knowing how to create vocals that are professional is important if you want to build a reputation as a producer.
Mixing our own or featured artists’ vocals so that they’re in time, punchy, tight, warm and dynamic is one of the many essential skills that a music producer needs to have. This includes understanding compression attack and release for vocals, as well as the use of parallel compression on vocal channels, gain staging and also how to use reverb on vocal channels too.
There are many steps in understanding how to produce solid vocals, and also how to make vocals warmer. So, we wanted to give you a few tips and tricks that you can take to get your vocal mixing skills to the next level.
What Vocal Mixing Does Your Track Need?
But wait! No two tracks are the same. Consequently, how your vocals should fit in a track varies massively with each track you’ll create. Sometimes vocals need to be thick and crunchy. Yet in some tracks, they need to be more clean and airy. Other times they need to be tighter, while on other occasions they need to be loose.
Like almost everything in music production, there is no one size that fits all.
But don’t get flustered so soon. There are some vocal mixing methods that you will be using in every instance where you have vocals. Using these methods effectively together is the real goal.
How to Use EQ on Vocals
All vocalists have a unique character. We call this “timbre“. This and the actions you take with your EQ will vary between vocalists you work with. Our vocal cords aren’t trying to make it hard for us. It’s simply because the frequency content naturally differs between different people.
We use EQ’s for more than one thing, of course. They’re a lifesaver (or a mix saver?). So, let’s look at how we can use them to make our vocals sound epic!
Use subtractive eq on your vocals to remove excess frequency content.
Place your chosen EQ on the vocal channel(s) in your mix. We recommend experimenting with a shelving EQ or a trusty parametric EQ.
As we’re manipulating vocals, we want to attenuate the low end more than the high end. Apply a 6dB slope of low cut/high pass at a cut off point of about 100 Hz. This is only our starting point, so begin moving the slope up the frequency scale and make sure you’re listening intently to what it’s doing to your vocals.
As soon as your vocals start to lose body – stop and slowly move the slope back down until you have enough body left. Alternatively, you experiment with a low shelf filter, rather than an EQ, because a high pass slope may be harder to effectively cut the unneeded frequency content without affecting what you want to keep. But be mindful of what you’re doing with your shelf filter as you may amplify the unwanted frequency content.
If you find issues with specific frequencies in your vocals…
- Find the frequency range that is causing your issue by isolating different bands in your EQ. Then turn it off.
- While its off, apple a cut at your problematic frequency. Make sure it’s a narrow cut, like a notch, so you don’t remove too much of teh surrounding frequency content.
- Now turn your EQ back on and see if it did the trick. If it did, great! If it didn’t then turn the EQ off and adjust the cut as you need.
- Repeat!
How to Apply Reverb to Vocals
It’s time to create space. Reverb can place your vocals in a room, or just about anywhere if you use the right settings. As humans, we associate reverb with distance. So you can use reverb to push the vocals back in the mix (at least, make the listener perceive that this is the case).
First up, create a parallel aux track so you don’t affect the original signal. Apply an EQ of your choice as well as, but before, reverb to it with small/medium room settings. The EQ will allow you to shape the tone your reverb is receiving!
Do the same again on a second aux track, but this time with large room settings. When both of your reverb tracks are receiving signals, apply a compressor after both reverb instances so you can control the dynamics of your reverb.

Now use your sends and levels to blend the reverbs together with the original signal into a space that sounds awesome. Make sure you automate your sends to create more dynamics through your song.
Make sure you experiment with the different settings available to you and make sure you also experiment with different reverbs. Each will bring something different so get to grips with what’s in front of you and get the most out of your vocal space. It may even be good to apply two different reverbs to the two aux channels, but this may cause more problems than solutions in some scenarios.
The Different Uses of Delay on Vocals
Use delay to emphasize individual word and/or phrases:
- Apply delay to your vocal channel and sync the delay time with your tempo with a 1/8, 1/4 or 1/2 setting.
- Make sure your your feedback is at zero.
- Now adjust your return level so you can hear the very first tap of your delay.
- Next up, slowly increase your delay until it swallows the space between your desired phrases.
- Finally, automate your send to empahsises or throw specific parts of your vocal the vocal.
Create movement and interest in your mix:
- Add your delay as an insert.
- Set your delay time to sync with your DAW tempo. Try a dotted 1/8, 1/4 or 1/2 delay. You could even remove sync and manually dial in an interesting delay times here.
- Set your feedback to zero.
- Set your return level so you can hear the first tap of your delay.
- Now increase your delay feedback until it fills up the space between phrases!
Make your vocal sound bigger with a slapback delay:
- Add your delay as an insert.
- Remove sync. Set your delay time to between 80ms and 120ms give or take.
- Keep your feedback set to zero or as low as it can go.
- Blend your your delay in with your main vocal to taste.
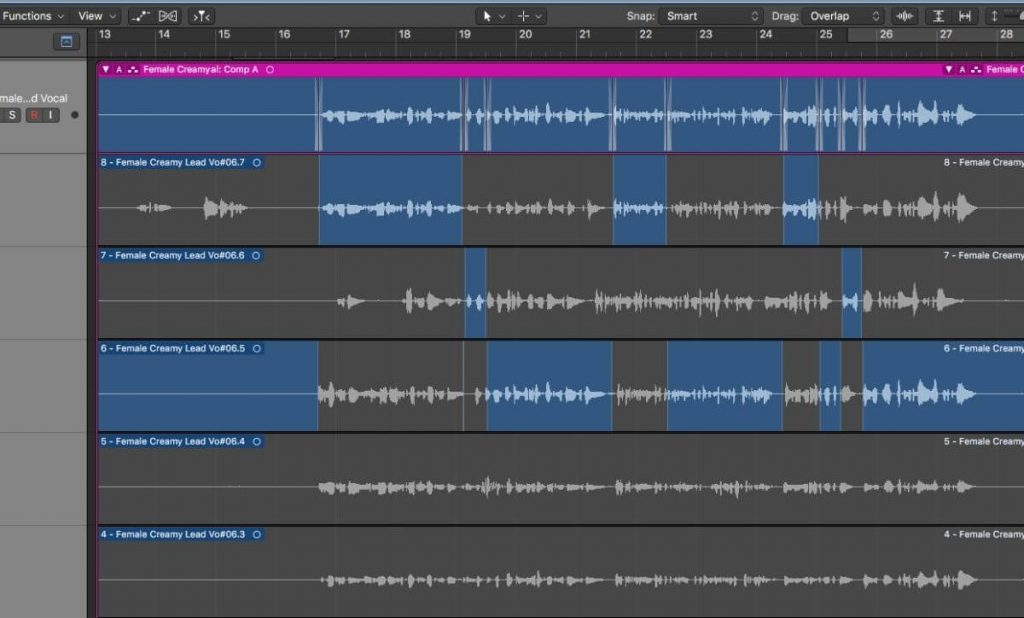
How to Use Vocal Comping to Ensure Smooth Vocal Phrases
Firstly, what is vocal comping?
Lets’ say you’ve done seven takes of the same lyrical verse. By vocal comping, you’re taking the best parts of each take and combining them into one super take. This gives you a seemingly astounding recording with no errors. It’s what makes weaker vocalists sound good and great vocalists reach number one in the charts!
- Stack each vocal take as seperate channels in your DAW’s arranger view, while making sure they’re all in time with one another.
- Create an empty track for the best parts of each take.
- Loop the first phrase of your vocal and audition each take one at a time in that loop.
- Then cut the best take of that phrase and paste it in the empty channel.
- Keep each pasted phrase in time with the other takes and repeat the process with the second, third, and fourth phrase.
- Dissect, cut and paste segments from individual phrases too. Sometimes it could be neccessary to audition indivudal words from different takes.
- When you’re happy with what you’ve got, use volume fades to ensure clean transitions between audio clips.
It’s very important that you’re constantly aware of how the vocalist has delivered each phrase when you’re auditioning different takes.
The final comped vocal take needs to be clear, in tune and has the right emotion you’re looking for. The volume fades you apply can’t make segments sound in tune if the vocalist was in a slightly different key. But, providing your takes are in tune with one another, the volume fades will be the cherry on the cake that give your listeners the impression that it’s one recording.
How to Make Your Vocals Sound Wider and Thicker
Vocals are almost always front and centre of a mix. Unless a Hyperpop artist wants to do some funky panning with glitch effect in true Hyperpop fashion, but that’s beside the point.
But just because a vocal is in the centre, that doesn’t mean that there is no panning involved.
- Create two copies of your vocal so you have three instances of it.
- Pan one copy to the left and the second copy to the right. Aim for a pan ratio of about 60% to 95% as hard left and rigth will probably be too extreme.
- Next, pitch shift one copy up by about 3 to 5 cents. Pitch the second copy down a few cents by the same amount.
- For even more depth, delay only one copy by about 8 to 11 milliseconds (being aware of possible phase issues).
- Finally, blend the two copies into the original by adjusting the levels of each. You could do this by light compression or reverb to glue them together.
It’s important to check the phase after this method, but this doesn’t need to be tedious. A phase meter such as Levels will do the job.
If you wanted to, you could even add more vocal copies and experiment. By adding automation, you could also have words or segments being wider and thicker than others to emphasise particular parts of the vocal.
Use Levels to Make Your Vocals Sit Right
The level you set for your vocal will determine how upfront your vocals are in your mix.
With a lower level, your vocals sink into your mix. Should you push the level up then the vocal comes to the front.
So, we use levels to determine how upfront our vocals are and how they sit compared to the rest of the mix. Before you undertake this mission, listen to the other tracks in your mix so that you have context. Context allows you to hear the mix as a unit. By just focusing on the vocals you’re shooting yourself in the foot before you’ve even begun.
- Lower the level of your vocals to 0.
- Now bring the vocal level up until it’s slightly to loud.
- Now lower the level by about 3dB.
- Listen to the result. If it sounds right, well done!
- If you need to, raise the level again by 1dB to 2dB.
Now you should have a level that sounds right or close to it. Continue to experiment with slight rises until the vocals work well with the rest of the mix.
The goal is to aim for the best static level. That is 0 automation.
But once you’ve found the best level, you can then begin using automation to emphasise or minimise different elements of the vocal. Compare your results to a reference track and see if there are any obvious differences that need your attention.
How to Use Automation on Vocals
Automation is a simple tool to create amazing dynamics in your mix. Oh, boy, it’s used by every producer and EDM artist I can think of.
We can automate things such as EQ’s to create filter sweeps or temporarily boost or cut specific frequencies, as well as time-based effects such as reverb to add space or delays to create throws.
But lets’ focus on basic volume automation. This will allow you to prepare your vocals for your compressor. This actually makes it much easier to get an even response that’s consistent output from your compressor, no matter what settings you go for.
If a word or phrase jumps out at you a little too much… then you can automate the volume of that small segment and attenuate it by dB or a few. As with setting levels, if it vanishes in the mix then automate a boost as well as or instead of a cut.
To get more punch out of your chorus you can boost the first word. It may also be good to emphasise breath at the end of the phrase for some additional accenting.
The possibilities are truly endless.
Automation allows us to create excitement, character and energy by automatically adding or subtracting applied effects and volume over time. It allows us to make space before a drop or a chorus by thinning out elements, so start experimenting and never stop innovating.
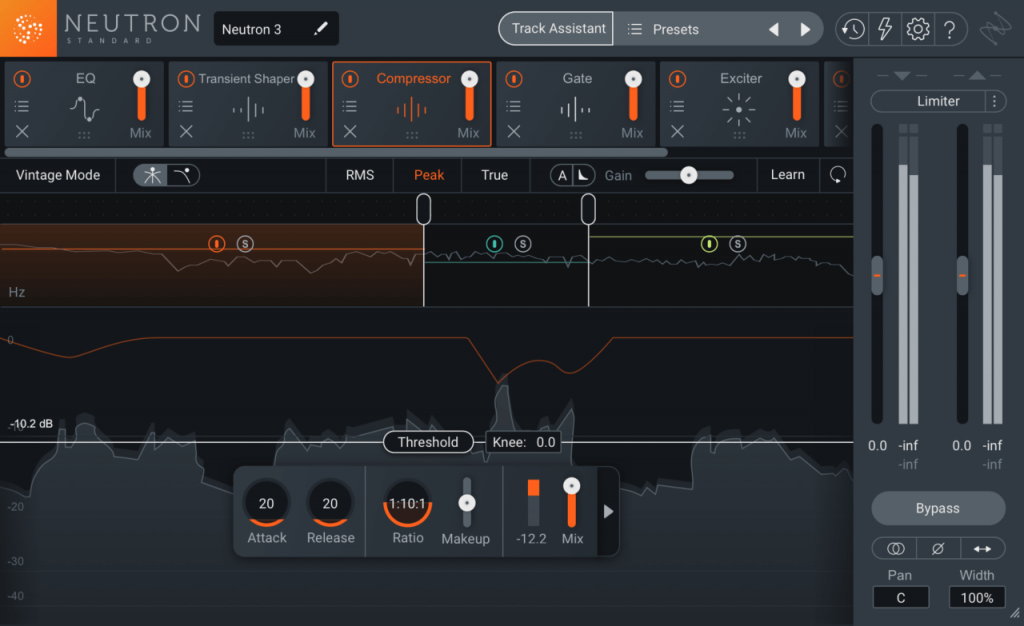
Compressing Vocals
Vocals are often compressed at more than one point in the mixing process. The amount you add depends on the music you’re making and what genre it fits into. Genres such as jazz have a light amount of compression compared to genres such as pop and hip hop.
For a full breakdown of compression, click here.
While compressing, there are a few things we need to pay attention to, so here’s a simple guide on compressing vocals:
- With a compressor on your vocal channel, lower your threshold to zero. Pull down its attack and release times as low as they’ll go and raise your ratio as high as it’ll go too.
This exaggeates the compression so it’s obviously noticeable. - Now begin adjusting your settings by raisng your attack time. Focus on the transients which are the very beginning of your words (have a hyper focus on s’s and t’s).
Increase the attack time until each transient has the right amount of thickness/thiness for the vocal in question. Bear in mind that a faster attack time will thin out trasnients while a longer one will thicken them! - Now move onto your release setting and slowly increase it. The goal is to make it somewhat musical. To do this, pay attention to when the compressor lets go of the signal. A short release time will sound like it’s sucking and then pumping. With a slower release time you can manipulate this so it blends with the rhythm of the music!
- Now its time for your ratio. The higher your ratio is the more squished your vocals wil be. This means the higher your ratio is the denser your vocals will be. On the flip side, a lower ratio will make your vocals seem more transparent and airy to the listener.
Aim for a lower ratio. A ratio of 2:1 is a good starting point to maintain the effects you’ve created with your attack and release times. But, should you feel this isn’t hitting the spot then go for a higher one. Maybe an 8:1 ratio could work if not a 4:1?
However, it may be a good idea to use more than one compressor – especially if you have a higher ratio. Rather than use one compressor with a 8:1 ratio, have one compressor with a 2:1 ratio and another with 4:1. This usually sounds nicer as there’s more “breathing room” for the vocal track – pun not intended…
On a serious note, the vocals will have a different tone because of the indivual settings of each compressor not matching. - Finally, let’s adjust your threshold. Raise the threshold until you have between 2dB – 4dB in gain reduction. From here you can adjust until it sounds right to you.
There are many compressors that are great for vocals. However, we think one of the best compressor plugins for vocals is Nectar 3 by iZotope.
But there is more than one way to compress vocals! Parallel compression is amazing at maintaining the dynamics of the sound while adding depth to the body of the vocal.
- Rather than having the compressor on the vocal track, create an aux channel with the compressor on it. Make sure the signal is being sent to the aux from the vocal channel.
- Compress the aux signal. It’s important to really squash the aux track to really achieve the potential of parallel comression.
- Blend the compressed signal back into the main vocal by adjusting the levels of each and attenuating or raising the send.
Here’s a fantastic list of compression issues to listen out for on vocals by Renegade Producer.
- Over-compression: Compressor is clamping down the whole time. Raise the threshold to ease off the compression a bit. You want your softer parts uncompressed.
- Too wide/loose/not focused enough: Up your ratio a bit.
- Too narrow/tight/focused: Lessen the ratio.
- Lacks punch: Try a longer attack setting.
- Lacks body: Try a longer release or higher ratio.
- Pumps too much: Make release longer.
- Doesn’t swing or groove right: Adjust release to get your compressor to make it let go of the signal in a more musical way.
Before we move on to the next vocal mixing trick, let’s talk about how to de-ess a vocal channel.
De-essing is, essentially, taming harsh transients caused by sibilants (s’s & t’s). You can use an EQ to do tame frequencies between 5kHz and 12kHz, but this will cut those frequencies for the entire duration of the vocal.
De-essers are frequency-specific compressors that allow us to remove sharp sibilance. They compress a specific band of frequencies each and every time they cross a pre-determined threshold!
- Your first step to de-essing should be to use an EQ to assess what frequency range your sibilance is causng problems at.
Because our voices have unique charcteristics, the problem frequencies are usually diffrent between different vocalists. Analyse between 5kHz and 12kHz and see if you catch all of the dreaded s & t sounds. - Now add your de-esser to your vocal track and set the the same frequency range you found problems with.
- Now attenuate its threshold until your de-esser kicks in. Attenuate it further until sibilance is a reasonable or unnoticable level. Raise it again if your words become overly compressed.
How to Apply Distortion to Vocals
We apply distortion gently. It can ruin your vocal mix if you go over the top. But it does allow you to add exciting harmonics, or just excite existing harmonics. To ensure you get it right, apply it to a parallel aux track rather than the original signal.
Before you activate your distortion on your parallel track, apply an EQ so you can monitor what’s going into the distortion plugin. Also, apply an EQ after your compression. Distortion my well add unwanted content so you’ll want to remove those as and when!
Now, raise the send level of your aux track until you get a nice blend between the original vocal signals nd the distorted signal.
Distortion allows us to make vocals sound warmer via light saturation, or it can create entirely destructive effects with the likes of bit crushing.
Distortion comes in all shapes and sizes, so click here to find out which one you need!
How to Tune Your Vocals
Rather than applying an autotune plugin, why not pitch the offending notes up or down individually? This will give you such a good learning opportunity rather than software that just does it for you.
Here’s a great tutorial by Warren Huart on vocal tuning!
Great mixing skills can’t make bad sounding vocals sound good. You need a place where you’re guaranteed to find top quality vocals that you can access there and then.
We at Mixxed work with a growing number of sample labels and contributors to provide you with a premium sample subscription service that’s more accessible than any before.
You’ll have access to our growing catalogue of thousands of loops, one-shots and sound effects that you can browse, download and keep forever for less than $3 a month.
Sign up today to find your sound!