Studio Monitor Placement: Where Should You Place Your Speakers?
A detail such as poor monitor placement… can have a far bigger impact on your sound than the monitors themselves! Poorly positioned monitors create huge peaks and troughs in sound. Proper studio monitor placement is essential if you want accurate reproduction of what’s happening in your DAW.
Imagine spending hundreds on studio monitors. Great! They look cool and sound amazing. Or, do they?
Many people spend this amount on studio monitors without being aware of how to properly place them in their room, which seriously minimises any chance of creating a well-balanced mix.
What’s the Best Studio Monitors Placement For Mixing?
This is subject to a hot debate and it has been for quite a while. Studio engineers have come to agree that the general “ideal” positioning follows two guidelines.
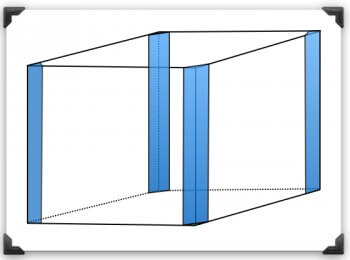
Your head should form an equilateral triangle with your monitors.
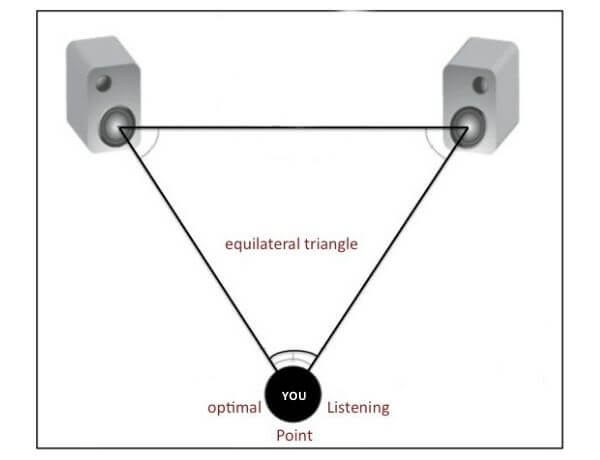
Above, you can see that your head should be the finishing touch to an equilateral triangle. An equilateral triangle features three sides that are all of the same lengths. To keep things simple, a good rule of thumb may be to have your monitors five feet apart from one another and ensure you have 5 feet between you and both monitors.
The reason for this simple step is to ensure an industry standard. If there was no standard, stereo images would vary massively between different studios.
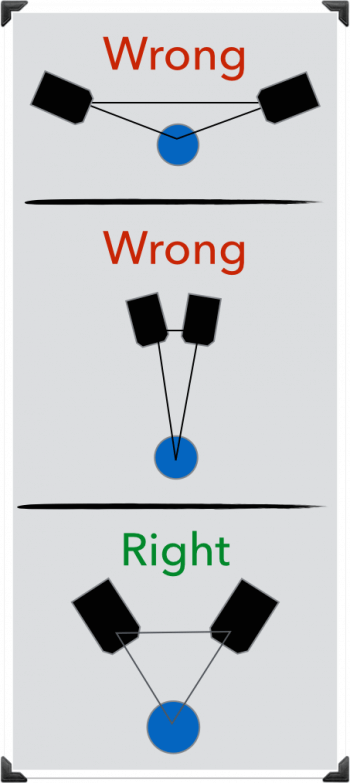
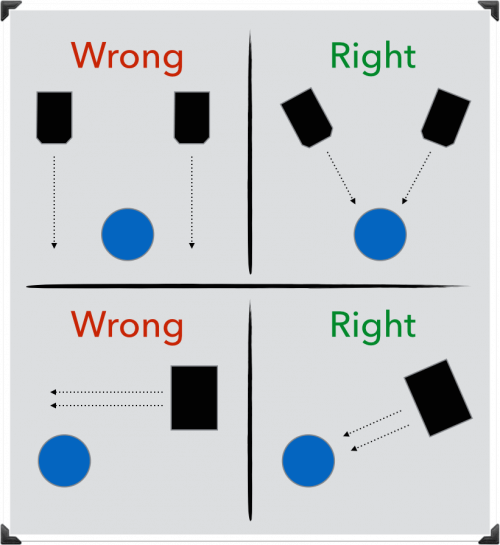
Your monitors should be pointing directly at your head.
When your monitors are directly facing you, your higher frequencies are much more noticeable. This is because high frequencies are much more directional than low frequencies, so having your tweeters facing you directly allow you to notice them in the context of your mix.
Advanced Studio Monitor Placement
Our goal when placing studio monitors is to create an environment where a natural sound balance can exist. That is a sound that room acoustics don’t alter.
Studio monitor placement is one factor that you should keep in mind. The second factor is the bigger obstacle.
Your room itself. Your room is the biggest obstacle because of what we call room modes.
What are room modes?
Room modes form when:
Your room dimensions are the same size as the wavelength
OR
Your room dimensions are a multiple of the half-wavelength (literally, half the length of the soundwave). So, if there are three wavelengths in a soundwave, half the wavelength would be 1.5.
To explain them simply, room modes are a collection of resonances in a room from a sound source (your monitors). The resonances affect the low-mid frequency ranges as these wavelengths are longer than high-frequency soundwaves.
These resonances create standing waves which affect the overall volume and rate of decay of the sound we perceive from our speakers. Standing waves are soundwaves trapped between two opposing walls!
Should your home studio have two equal dimensions and form a perfect square shape (like 10ft x 10ft or 20ft x 20ft), then your room is amplifying the problem. This is because you’ll have twice as many standing waves. Cubed rooms are the worst room to have.
Back to our point about wavelengths, remember that lower frequencies have longer sound waves. This makes them far more vulnerable to standing waves.
To calculate wavelength in a room, you should divide wave speed by frequency. “Wave speed “is determined by the medium of which the sound is travelling… which is air.
Sounds travel through the air at about 332 meters per second.
332 msps / 100 Hz = 3.32 msps. Convert that figure into feet and you get roughly 11 feet.
332 msps / 10000 Hz = 0.0332 msps. Convert that figure into feet and you get roughly 0.1 feet.
You can see that lower frequencies have much longer waves!
If your far wall is 10 feet away from your monitors, standing waves are going to be a real problem.
How do we solve them?
Position monitors against the longest wall.
To maintain a symmetrical stereo image, it’s important that your setup is halfway between the side walls. That is, if your room is 100ft x 50ft, you want to place your setup in the middle of one of the two 100ft walls. This will minimise problems from side reflections.
Ensure there’s space between your monitors and the rear wall.
Sound travels in all directions.
When frequencies travel backwards and reflect off of your rear wall they merge with the direct sound from your studio monitors.
This creates what we call the boundary effect. The boundary effect amplifies bass frequencies because both the direct and reflected sound are combining to make you perceive the low frequencies as louder because the lower wavelengths are far longer than the high-frequency ones.
The closer you are to your wall, the slower wavelengths that bounce back are almost in time (phase) with the direct sound from your monitors. This amplifies frequencies that are in phase cancels out frequencies that aren’t.
I doubt you have the funds to build your monitors into your wall as professional studios do, so create as much space between your monitors and your rear wall as you possibly can. If you can, aim for at least 2 feet if you can.
Then make sure you get some acoustic panels directly behind your monitors too!
If you own monitors that have rear bass ports, you will have a harder time than if you had monitors with front bass ports. Front bass ports project a bigger portion of low frequencies in front of the monitors rather than the rear ports.
Monitor, Chair and Desk Positioning For Optimal Sound
Head positioning is as important as monitor positioning.
Here are some steps to follow to ensure you receive an altered sound from reflections.
- Ensure the height of your monitors is either slightly above or below the mid-height point between your floor and ceiling.
- Centre your chair between your monitors (which sit directly between your two side walls).
- Ensure your chair height allows for your head to be in front of your monitors.
- Position your desk so that it’s halfway between your front and rear wall (and in front of your monitors, obviously).
- Now measure the distance between all of these variables, as well as the distance between your rear wall and monitors. Make sure each measurement is not the same as another and that none are multples of another. If any are the same or are multiples of each other, adjust applicable dimensions as and when needed.
Add Acoustic Treatment
We touched on adding acoustic treatment directly behind your monitors which you should absolutely do. For guidance on how to acoustically treat your oom, click here.
To summarise where to position bass traps and acoustic panels:
Assessing how badly your room suffers from the reflected sound is a must. To do this we use the clap test, so start walking around your room and clap from every point in the room! This’ll inform you as to where treatment will be best placed.
Step 1
Place a bass trap in each trihedral corner of your room. If you only have four traps, place them in the upper corners. If you have eight, place them in the lower ones too!
If you have or will have more, begin placing them between the upper and low traps in each corner.
Step 2
Now that you have the trihedral corners all sorted, it’s time to work on your upper dihedral corners!

How to Position Your Acoustic Panels
You’ve mounted your bass traps and your panels are in the box ready to go. Two basic steps you can take before worrying about the whole room are:
The first place to stick panels is directly behind your studio monitors.
If you have any empty spaces on your dihedral corners, use some panels to fill them!
To know just how much wall you need to cover with acoustic panels, you should continue doing the clap test. As you’ve filled the room with bass traps and some panels, it’ll sound a lot drier. The only way to truly know where panels will be most effective is to keep clapping!
A handy trick to know when you’re on a budget is to keep one area of a wall empty if you have a set of panels directly opposite. Panels on one wall are enough to kill standing waves in that area.
Whether you have primed your room and speaker placement for sound quality or not, finding great quality samples shouldn’t be hard work.
We at Mixxed have been building our platform that makes it easier than ever for you to find the sounds your sample library has been missing. We’re working with sample creators who, like us, believe in democratising the sample market.
For less than $3 a month, you’ll have access to our ever-growing catalogue of samples that you can browse, download and keep forever. Our users are already making epic music with the thousands of sounds already available.
Sign up today to find your sound and get involved!