5 Psychoacoustic Sound Design Tips To Improve Your Sound Design, Mixing, and Music Production
In electronic music, sound design is a foundational pillar to music production. It’s a process full to the brim with neat tricks and ideas that can make a mediocre sound become a memorable one. Budding musicians and producers take psychoacoustics and for granted.
But if you want to improve your sound design and mixing skills, you need to stop.
We’re here to provide some neat tips that are going to aid you in taking your music from good to great. Both your sound design and music production skills are about to get a makeover. Strap in, and get ready to learn about how you can bring the science of sound into your music.
The Haas Effect
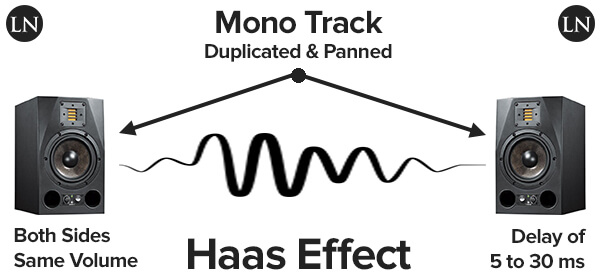
We can use the Haas effect to create an illusion of spacious stereo width, starting with only a mono sound source.
Dr. Helmut Haas was studying how ears interpret the relationship between an original sound source and their early reflections within any given space. Haas concluded that if early reflections of an original sound are heard less than 35ms after the original sound occurred, and at a level no greater than 10dB louder than the source, then ears would interpret the original sound and its early reflections will be as one.
The direction of the original sound is preserved. However, because there is a subtle difference in phase between the sound and its reflections, the early reflections add an element of spatial presence to the sound as our ears perceive it.
So, the Haas effect allows us to “thicken” a sound. We can spread a sound out in this way by creating a copy of the mono sound source and panning one to the left and one right.
Next, add a slight delay to only one copy. Between 10-35ms should do the trick. This tricks the minds of your listeners into perceiving width and space that isn’t actually there, and it leaves the center of your stereo field open for other instruments & elements.
This technique is also very handy for avoiding masking instruments. If your mix is very busy, duplicate and pan an instrument left and right, and experiment with delay times between 12-35ms. You can also use this technique to pan a mono signal away from a busy center in order to avoid masking from other instruments. At the same time, you don’t want to unbalance the mix by only panning to one side or the other.
Avoid Masking by Using Powerful Sounds
You may have experienced masking before. Masking happens when two or more sounds sit in the exact same frequency range. Whichever sound is the louder sound will partially or entirely mask/hide the other sound. It disappears from your mix. Poof.
We don’t want this. When you’re writing, arranging, and mixing, you need to have masking in the back of your mind. Before you utilize two or more sounds that sit in the same frequency range, make sure you have an EQ at the ready to carve out the masking frequencies… or avoid using one of the sounds entirely.
We can avoid masking during the writing and arranging processes by simply using sounds that fill their own frequency ranges. Even then masking can occur and may even be difficult to determine an element that sounds different when paying solo compared to how they sound in the full mix.
But it does go a little deeper. The root note/dominant frequency of a sound takes up the majority of its space, but its harmonics appear at different frequencies. It’s important that you analyze whether or not the sounds in these frequencies are masking those harmonics. If so, grab an EQ and carve out the masking frequencies. Even masked harmonics can alter your perception of the sound in the mix.
Create More Power at Lower Levels
Our ears’ natural frequency response is non-linear. Our ears are much more sensitive to mid-range frequencies than any in the extreme high and low ends of the frequency spectrum.
We don’t notice this in our day-to-day lives. But when we’re mixing it becomes more apparent when relative levels of instruments at different frequencies change when we lower the volume. Load up your latest track, play it, and lower the volume leaving your computer. Do you notice how the highs and lows are music quieter than the mids?
How do we work around this? Well, you can manipulate the ears’ non-linear response to different frequencies and volumes and create an enhanced impression of loudness and punch in your mix, even if the listening volume is low.
Our ears are much more sensitive to mid-range frequencies than any in the extreme high and low ends of the frequency spectrum.
As the actual loudness of a sound changes, the perceived loudness our brain hears changes at a different rate. This is frequency dependant, of course, but it means you can listen to your mix at low volume and think it sounds really good. But then you crank up the volume and think there’s something wrong with it.
To get over this hurdle, begin thinking about your listener and their typical environment. It’s time to begin mixing in a fashion that accommodates them and not just so the mix sounds great from your studio perspective.
Because extremely high and low frequencies stand out more when we listen to loud sounds, we can create the impression of loudness at lower listening levels by simply lowering the mid-range and/or boosting the high/low ends of the spectrum in our mix.
You may have heard the term “smiley face EQ” before. Producers talk about “scooping the mid-range” to add weight and power to a mix, and this is exactly that. By attenuating the mids, the highs and are more perceivable at lower volumes.
But be subtle with your attenuation and boosts. It’s very easy to overdo any broad frequency edits across a whole mix.
Roll Off Highs and Lows to Push a Sound Back
To achieve greater depth in your stereo field and make instruments appear further away, you can roll off a sound’s extremely high and low frequencies. This leaves the foreground of your stereo image is clear for your lead. We can use this technique to emphasize a lead vocal in front of backing vocals.
Use a low pass filter to roll off the high end of a sound, and you’ll soon notice that it seems further away than other elements in your mix. But be cautious that you don’t get rid of too much high-end and actually muddy the sound. Actively listen to what you’re doing to the sound as you do it. And don’t be afraid to take a break and give your ears a break!
You can also use a high pass filter to roll off some low end of the sound. This will reinforce the effect of the sound being further away as low-end frequencies also get absorbed by air the further you are from a sound.
Transients Appear Quieter Than Sustained Sounds
Our ears won’t perceive a short sound as loud compared to a sustained sound at the same gain level. This is known as RMS/root mean square. RMS is a mathematical way of figuring out an average signal level. It’s the key principle behind how compression works and makes sounds louder without increasing the peak level of the sound.
by compressing the tail of a sound, you can trick your listeners’ minds into thinking the sound is louder and punchier while the transient of the sound has not changed. This allows us to use compressors to get the most out of a sound. But avoid going crazy with your compressor and flatlining your mix.
These tricks can be applied to any sound, not just VST libraries. Is your sample library up to the challenge?
The sampling revolution has risen in popularity and shaped music since the early 1970s. Sample culture continues to transform how millions of artists and producers do their thing in DAWs.
You too can break conventional norms, challenge the status quo, and open Pandora’s box of sound design.
Mixxed works with a growing number of sample labels and contributors to provide you with an affordable sample subscription service that’s more accessible than any before.
You’ll have access to our growing catalog of loops, one-shots, and sound effects that you can browse, download and keep forever for less than $3 a month.
Sign up today to find your sound!