
Reese Bass Tutorial: 7 Steps to Make Epic Basses!
How to Make a Reese Bass in Serum, Massive, and Vital
You’ve been questing through the woodland of the internet to find the sword in the stone of music production. Your thirst for knowledge must be quenched, but it’s days until the next water source.
Don’t worry. Your trusty steed Mixxed has arrived and brought not only the sword but the stone too. It’s time for a DnB reese bass tutorial… but you can apply this sound to any electronic genre if you have the imagination.
We’re going to tell you how to make a reese bass sound that sounds like the one true God that is Noisia. We’re using Serum as the example VST, but you can apply all of these steps to Massive, Vital, and so many more!
7 Steps to Make Epic Basses!
How to Make a Reese Bass
- First up in this reese bass tutorial, you’ll only need Oscillator A for this. Use the default Saw wave and set the Unison setting to 6 Voices for a nice and wide sound.
- Change the filter on the right hand side of the interface to a reverb filter and apply it to oscillator A. Apply LFO 1 (leave it as a default triangle wave for now) to the filter cut off with the rate at “1/2”. Ensure the mode is set to “off”. Use the LFO to modulate movement filling 55% – 95% of the filter cut off dial. Set the filter resonance to 75%, turn the filter drive right up, and set the filter “damp” to 45%. Now, turn the master down. You’ll hear why.
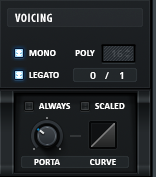
- In the bottom right of the VST, make sure “Mono” and “Legato” are checked and operational, as well as legato. This will keep your voices more streamlined and the sound will be cleaner. Also, apply 50% portamento (“port”) for extra smoothness between notes. Leave “Always” unticked.
- Next, in the bottom left, turn the pitch bend slide (the top box) up to 24 – this will allow you to dial the transpose wheel up by 24 semi tones

- Your reese bassline is coming along nicely, right? Now, a create notch filter inside of the Serum EQ (example below). Apply the same “1/2” rate LFO 1 to the left hand frequency knob for the low end and modulate around the 40% – 55% mark. Turn the left hand gain right down, and leave left hand Q as it is.
- Apply a deafukt multiband compressor and turn gain back up. Feel free to edit the compressor settings as you see fit, but look into applying a loudness meter on the mixer channel in your DAW to accuratly asses what levsls your reaching.
- To put the cherry on the cake, apply a little bit of dimension to your bass and even a bit of distortion. This is a matter of individual taste, so you may like what these FX do or you may not.
And Now You Have a Reese Bass Sample
Your quest has come to an end. If your reese bass doesn’t sound quite right, revisit steps 1-7 and compare your settings to the ones we have instructed. You may want your ass to have a lower tone, so lower your oscillator A semitones by 12 or 24 and see what happens!
Don’t forget that you can find lots of sounds on the Mixxed site that will work with your reese bass sample pack and bring any music you make to a whole new level!
READ MORE: Sine Compression Bass Tutorial